

Let’s be honest, good pictures really matter when it comes to getting attention. We’ve all seen bad pictures where the fish is in bad condition or perhaps the cameraman has put his finger in the picture. No matter how impressive the catch is, it can be tainted by the quality of picture. In this article, I will share how I take pictures and make the fish look good with only a phone camera. However fish photography is an art and we will all have different opinions. I’m not saying you should follow these exact steps but I have been using the same formula for years and I’ve always been happy about it.
In Part One, we will discuss how to to handle your catch to ensure the photo is as presentable as possible.
Take Care of the Fish!
No matter how you take pictures of big fish, prioritize the survival of the fish as much as possible. I’m guilty of some big fish not swimming off well and it will happen from time to time. If you look after the fish, they will look good in the photos. I personally will always try to get a picture of the fish but if I feel like time is limited, I will just let it go as long as I had a few good shots.
Ice fishing has the danger of the eyes of the fish freezing. Since fish can’t blink like humans, cold weather can damage the eyes causing the fish to be blinded permanently. Frozen eyes don’t look good in pictures and will face heavy criticism over social media. To avoid this, dip the fish in the water frequently. This has the added benefit of washing snow off the fish’s body. If possible hold the fish in the hole until the camera is ready. If the weather is extremely cold, take the pictures of the fish in the shack. Fish pictures outside the shack are nice but they are not worth the life of a trophy fish.

If possible, unhook the fish in the water or unhook it while firmly holding the fish. Try to avoid letting the fish flop on a hard surface as much as possible. Though I will admit this is something I still have to work on. Unhooking fish will always be tricky but do what you can. Once the fish is unhooked, let the fish rest in a net or a pail while the camera is being readied. The fish will be able to breathe while also washing off any dirt or blood.
While looking like a hero is important, do consider the survival of the fish. Big predators are valuable to the ecosystem and should be handled with care. If your catch does not live, guilt can taint your impression of your photo, even if it turned out great.
Have the Camera Ready
Since fish are not meant to be out of the water, it’s important to be efficient with your time.
If you are by yourself, you should have your picture taking technique planned before you have to handle a fish. My personal method of taking pictures solo is to use my phone on a selfie stick. I would activate my camera by voice activation or a timer. If you are new to this, practice at home to get a feel of how far away you should be from the camera. Trying to work out the settings while managing a fish is something that should be avoided.

If you are with a companion, it’s a lot easier. If possible instruct your companions on how to use your camera and what your preferred settings are ahead of time. By working together efficiently, good pictures can be taken while looking after the health of the fish.
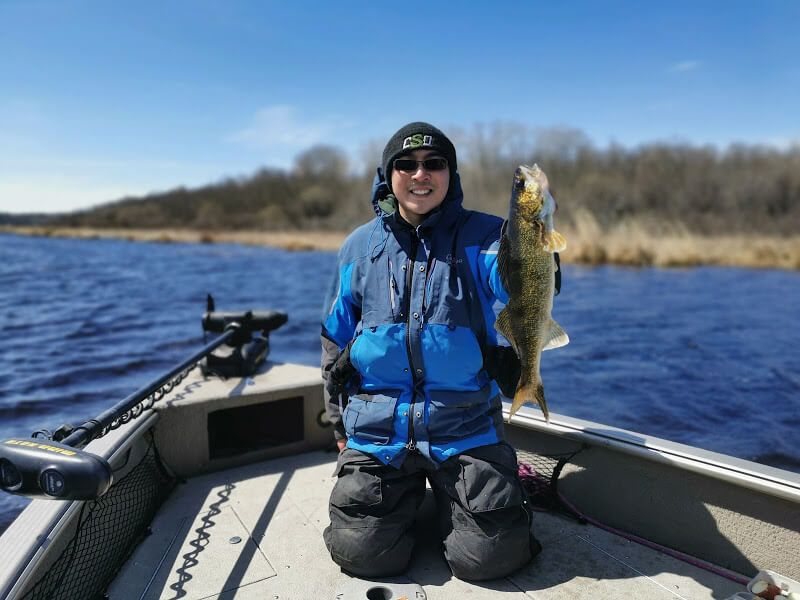
Holding the Fish
At this point, the fish is ready to have its picture taken. When holding the fish, usually I ensure that big fish are held horizontally. Fish in their normal environment are not meant to be dangling vertically. This can result in damage to the internal organs. I always try to support the mid-section of big fish in pictures.
Holding fish is different depending on the species. Some fish like walleye, pike and musky are best held by the gill plate which acts as a natural handle while the other hand supports the mid-section. Fish like bass, perch and crappies with sandpaper teeth can be held by the mouth. Some fish like stocked trout have fragile gills. To hold these trout, I hold the tail while supporting the mid section. Now writing on fish holds can pretty much be its own article. I would recommend that when targeting a new species, do research in advance on how the fish should be held.

Always maintain a firm grip to make sure that the fish isn’t dropped if they try to thrash. Though despite my best efforts, I encounter fish that act like a kid getting their first shot at the doctor’s office. Sometimes mistakes are inevitable. With practice you will get better at holding fish.
Extended Arm Controversy
This is the topic that everyone was waiting for. Everyone has their own stance on the issue and to this day, there is no general consensus on what is right. For those unaware, extending your arms when holding a fish causes the fish to look bigger in the picture. Some view this as a form of dishonesty as the fish appear bigger than they actually are. Others believe it’s fine to do so as it generates more interest for the picture.
My personal stance? I extend my arms in my fish pictures. I like having my pictures generating a lot of attention. I will be totally honest, it’s become a standard for social media success. Nearly every prominent angler does it. However when asked about the size, I will be completely honest about it. I will never claim that the 26″ walleye was 32″. I think it’s absolutely silly to lie about size anyways. Most experienced anglers can tell how big a fish is regardless of the hold.

Non-extended 
Extended
Whether you choose to extend arms or not is totally up to you. As long as you’re happy with how your picture turned out, that’s all that matters doesn’t it? Leave a comment below to tell us your stance on extended arms.
Final Words
Even before the first click of the camera, there is a lot of preparation that needs to be taken to ensure a quality photo. Looking after your fish will always result in a great photo. It definitely took a long time for me to learn how to do it properly so don’t feel bad if mistakes are made.
Part Two will go into the actual picture taking process and how to make your picture look good.


